Warm breadsticks are one of those things that can make a simple dinner feel a little more special. These sourdough garlic breadsticks have a soft middle, lightly browned edges, and a buttery garlic topping that soaks into the bread while it is still warm. The sourdough adds a gentle tang without making the breadsticks taste sharply sour.
The dough itself is quite simple. The part that needs the most attention is not the ingredient list—it is knowing when the dough has fermented enough and when the breadsticks are ready to leave the oven.
What Makes These Breadsticks Different?
Regular breadsticks can be made fairly quickly with commercial yeast.
Sourdough takes more patience, but it gives you something extra: flavor.
The longer fermentation allows the dough to develop its characteristic sourdough taste and a more interesting texture. You also get more flexibility with timing because fermentation depends on the temperature of your kitchen.
For these breadsticks, I would aim for soft and slightly chewy rather than thin and cracker-crisp.
That gives the garlic butter somewhere to go.
Ingredients
For the sourdough dough
- 100 g active sourdough starter
- 175 g lukewarm water
- 340 g bread flour or all-purpose flour
- 25 g softened unsalted butter
- 20 g honey or sugar
- 9 g salt
For the garlic butter
- 3 tablespoons unsalted butter, melted
- 2 garlic cloves, finely minced
- 1 tablespoon chopped fresh parsley
- Small pinch of salt
- Optional: ¼ teaspoon dried oregano
A freshly fed, active starter is preferable here. If your starter is weak and barely rising, the dough will usually tell you the same story later.
Before You Start
There are two things worth checking before mixing.
First, your starter.
It should look active rather than flat and lifeless. You should see fermentation bubbles and some rise after feeding.
Second, your kitchen temperature.
A dough sitting in a warm kitchen can move much faster than the same dough in a cool room.
So instead of deciding that the dough must ferment for exactly a certain number of hours, use the clock as a reference and the dough as your main guide.
That small change makes sourdough baking much less frustrating.
Mix the Dough
Add the starter, water, honey, flour, butter, and salt to a large bowl.
Mix until you no longer see dry flour.
The dough may look rough at first. That is fine.
Cover the bowl and let it rest for about 20–30 minutes.
After the rest, work the dough by hand or with a mixer until it becomes smoother and more elastic.
It should feel soft.
If it sticks slightly to your hands, do not immediately cover the dough in extra flour. A little stickiness is normal at this stage.
Let the Dough Ferment
Transfer the dough to a lightly greased bowl and cover it.
Leave it at room temperature until it becomes noticeably lighter and puffier.
This is where sourdough experience matters more than an exact number on the timer.
You are looking for a dough that:
- Has increased in volume
- Feels lighter when handled
- Looks smoother
- Shows some air inside
- Is no longer as tight as it was immediately after mixing
If your kitchen is cool, give it more time.
If your kitchen is particularly warm, start checking earlier.
Shape the Breadsticks
Once the dough has fermented, turn it onto a lightly floured surface.
Gently flatten it and divide it into equal portions.
Roll each portion into a rope.
Try not to make them extremely thin. Thin dough can bake quickly and lose the soft texture that makes these breadsticks worth making.
Something around the thickness of a small finger is a good starting point.
Do not worry if every breadstick is not perfectly identical.
Homemade breadsticks do not need factory-level uniformity.
Place them on a parchment-lined baking sheet with a little space between each one.
Let Them Puff Again
Cover the shaped breadsticks loosely and let them rest again.
They should look relaxed and slightly puffy before baking.
You do not necessarily need them to double in size.
One useful check is the gentle finger press.
Press one breadstick lightly.
If the dough springs back immediately, it may need more time.
If the indentation comes back slowly and the dough feels airy, it is getting close.
Avoid pressing repeatedly because you do not want to knock all the air out.
Make the Garlic Butter While They Rest
This part takes less than a minute.
Mix the melted butter, minced garlic, parsley, and salt.
If you like a little Italian-style flavor, add a small amount of oregano.
There is no need to cook the garlic first.
In fact, I prefer adding the garlic to the butter near the end of the process because it keeps the flavor fresh.
Just be careful when baking—the small garlic pieces can brown quickly.
Bake the Sourdough Garlic Breadsticks
Heat your oven to 400°F (200°C).
Brush the shaped breadsticks lightly with some of the garlic butter.
Bake for approximately 12–18 minutes, depending on their size and your oven.
You are looking for lightly golden edges and a baked center.
Do not wait for them to become dark brown.
A breadstick can go from nicely golden to dry surprisingly quickly, especially if you rolled the dough thin.
As soon as they come out, brush them with the remaining garlic butter.
That second coating is important.
The warm bread absorbs some of the butter, while the garlic and herbs stay noticeable on the surface.
What Should the Finished Breadsticks Feel Like?
The outside should be lightly golden.
The middle should feel soft rather than hard.
When you pull one apart, you should see a tender interior instead of a dry, crumbly center.
The sourdough flavor should be noticeable but not overpowering.
If you want very soft breadsticks, avoid overbaking them.
If you prefer a little more crust, make them slightly thinner and give them a little more color.
Why Did My Breadsticks Turn Out Dense?
This is one of the most common sourdough problems.
Usually, the first thing I would look at is fermentation, not the oven.
Your starter may not have been active enough
An inactive starter cannot give the dough the lift it needs.
The dough may have been shaped too early
If the dough still feels heavy and tight after the first fermentation, it probably needs more time.
Too much flour may have been added
It is tempting to keep adding flour when the dough sticks to your hands.
That can make the finished breadsticks unnecessarily dense.
Instead, give the dough time to develop before deciding that it needs more flour.
Why Are My Breadsticks Dry?
There are a few likely reasons.
They were too thin.
Thin breadsticks lose moisture quickly.
They stayed in the oven too long.
Even a few extra minutes can matter with smaller pieces of dough.
Too much flour was added during shaping.
This can make the dough stiffer and drier.
The dough did not have enough hydration.
Flour absorbs water differently depending on the type and brand, so the dough itself should guide small adjustments.
If your first batch is dry, I would change one thing at a time rather than completely changing the recipe.
Fresh Garlic or Garlic Powder?
Both have their place.
Fresh garlic gives these breadsticks a stronger, more noticeable garlic flavor.
Garlic powder is milder and spreads more evenly across the butter.
For a homemade garlic breadstick, fresh garlic is my first choice.
If you are worried about the garlic burning, use finely minced pieces and brush the breadsticks after baking as well as before.
You can also use a mixture of fresh garlic and a small amount of garlic powder for a more rounded flavor.
Easy Ways to Change the Flavor
Once the basic dough works, there is no need to reinvent it.
Parmesan garlic breadsticks
Add finely grated Parmesan immediately after brushing them with garlic butter.
Garlic herb breadsticks
Add parsley, oregano, basil, or Italian seasoning.
Spicy breadsticks
Add a pinch of red pepper flakes to the garlic butter.
Rosemary breadsticks
Finely chopped rosemary gives the butter a more aromatic flavor.
Extra-buttery breadsticks
Brush them once before baking and again immediately after they come out.
Keep the toppings reasonably light. Too much cheese or wet topping can interfere with the surface browning.
What to Serve With Them
These breadsticks are especially handy when you have a meal that needs something alongside it.
They work well with:
- Tomato soup
- Creamy soup
- Pasta
- Lasagna
- Marinara sauce
- Salad
- Chicken dishes
- Shrimp pasta
- Roasted vegetables
For a simple dinner, warm breadsticks, pasta, and a bowl of salad are enough.
You do not need to build an elaborate meal around them.
A Simple Marinara Dip
If you want a quick dipping sauce, warm some marinara and add a little dried oregano.
That is usually enough.
You can also add a small amount of Parmesan just before serving.
The slightly acidic tomato sauce works nicely against the buttery garlic topping.
Can You Use Sourdough Discard?
You can, but discard and active starter are not interchangeable in terms of fermentation strength.
Active starter is what you want when the starter is expected to provide most of the rise.
Older discard can still contribute sourdough flavor, but you may need another leavening method depending on the recipe.
So if your goal is naturally fermented breadsticks with a good rise, start with an active starter rather than relying on old discard.
Can You Prepare the Dough Ahead?
Yes.
Sourdough is actually convenient for this because refrigeration slows fermentation.
You can prepare the dough and use a cold fermentation schedule when it fits your routine.
If you refrigerate the dough, remember that cold dough will behave differently from dough that has been sitting at room temperature.
Give it enough time to become workable before shaping.
And again, watch the dough rather than trying to force it into an exact timetable.
The Small Details That Make the Biggest Difference
If I had to reduce this recipe to a few important points, these would be them:
Use an active starter.
A good starting point makes the rest of the process much easier.
Do not rush fermentation.
Sourdough needs time to develop.
Do not drown the dough in flour.
A slightly soft dough is easier to turn into tender breadsticks than a stiff one.
Do not overbake.
Lightly golden is enough.
Brush them while hot.
This is when the garlic butter has the best chance to settle into the freshly baked bread.
Sourdough Breadsticks Recipe Guide
If you want another version to compare with, you can also check our Sourdough Breadsticks Recipe.
That recipe is useful as a basic reference if you want to experiment with the dough before adding the garlic-butter topping.
I would treat the recipe as a framework rather than something that has to be followed mechanically.
Your starter, flour, room temperature, and oven can all behave a little differently.
How to Get Better at Sourdough
The first batch does not need to be perfect.
Pay attention to what happened.
Did the dough take longer than expected to rise?
Was it difficult to shape?
Did the breadsticks brown too quickly?
Was the center softer than you wanted?
Those observations are useful for the next batch.
Maybe your kitchen was cooler than usual. Maybe the breadsticks were rolled too thin. Maybe the starter needed another feeding.
Small adjustments are how sourdough becomes easier.
After a few attempts, you start recognizing the dough before you even think about the clock.
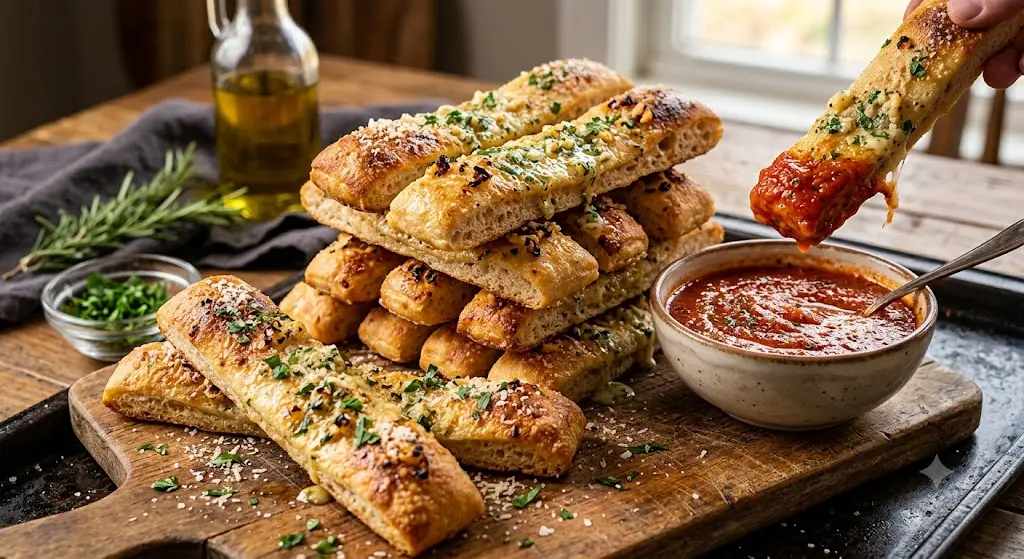
Sourdough Garlic Breadsticks
Ingredients
Equipment
Method
- Mix the dough: Add the sourdough starter, lukewarm water, honey or sugar, and softened butter to a mixing bowl. Stir until mostly combined.
- Add flour and salt: Mix in the flour and salt until a rough dough forms. Cover and let it rest for about 20–30 minutes.
- Develop the dough: Knead by hand for several minutes, or use stretch-and-folds at intervals until the dough becomes smoother and more elastic.
- First rise: Cover the bowl and let the dough ferment at room temperature. The timing will depend on your starter strength and kitchen temperature. Look for a dough that has become noticeably puffy rather than relying only on the clock.
- Shape: Transfer the dough to a lightly floured surface. Divide it into 10–12 portions and roll each piece into a thin breadstick.
- Final rise: Place the shaped breadsticks on a lined baking sheet. Cover loosely and let them rest until they look slightly puffy.
- Make garlic butter: Mix the melted butter, minced garlic, parsley, oregano, and salt in a small bowl.
- Bake: Heat the oven to 400°F (200°C). Brush the breadsticks lightly with garlic butter and bake for 12–18 minutes, or until the edges are lightly golden.
- Finish: Brush the hot breadsticks with the remaining garlic butter. Let them cool for a few minutes before serving.
Notes
- Use an active, bubbly sourdough starter for the best rise.
- Fermentation time can change considerably with room temperature and starter activity.
- If the dough feels sticky, avoid adding too much flour. Give it time to strengthen during resting and folding.
- For softer breadsticks, avoid overbaking them.
- Fresh minced garlic gives the topping a stronger flavor, while garlic powder creates a milder and more even garlic taste.
- Add grated Parmesan after baking if you want a cheesy finish.
Variations
- Parmesan Garlic Breadsticks: Add grated Parmesan while the breadsticks are still warm.
- Herb Breadsticks: Add rosemary, basil, or Italian seasoning to the garlic butter.
- Spicy Garlic Breadsticks: Add a small pinch of red pepper flakes.
- Extra Buttery: Brush the breadsticks with another thin layer of garlic butter immediately after baking.
Serving Suggestions
Serve these sourdough garlic breadsticks with marinara sauce, creamy pasta, tomato soup, salads, or roasted vegetables. They are also good as a simple snack when served warm.Storage
Keep leftover breadsticks in an airtight container at room temperature for up to 2 days. Reheat them briefly in the oven to bring back some of their softness and crisp edges.Final Thoughts
These sourdough garlic breadsticks are simple enough for a regular dinner but still feel like something you made from scratch.
The dough brings the sourdough flavor.
The oven gives the breadsticks their light golden surface.
And the warm garlic butter ties everything together.
Do not worry about making every breadstick identical. Pay more attention to the dough, fermentation, thickness, and final bake.
Those four things will affect the result far more than making perfectly straight breadsticks.
Once you have the basic dough figured out, you can turn the same idea into Parmesan, herb, rosemary, or spicy garlic breadsticks without making the recipe complicated.