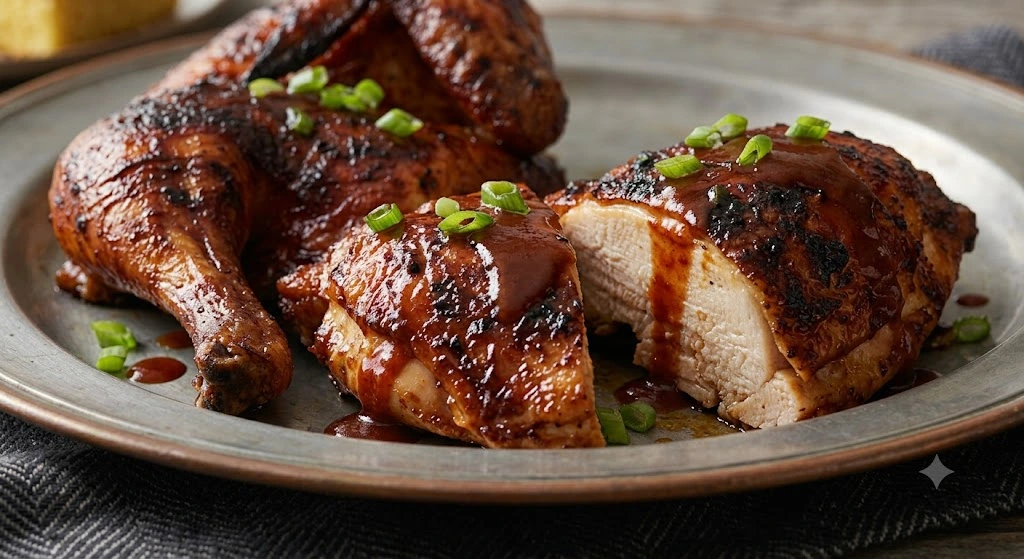
If you like chicken with a browned outside, juicy meat, and a tangy barbecue flavor, this port a pit chicken recipe is worth trying.
Port-A-Pit-style chicken is all about the cooking process. You do not need a complicated list of ingredients. The important parts are a good seasoning blend, a tangy basting sauce, controlled grill heat, and enough time for the chicken to cook without drying out.
This homemade version is inspired by the style people often associate with Nelson’s chicken recipe. It is not an official Nelson’s recipe, but it gives you a practical way to make similar pit-style chicken at home.
What Is Port-A-Pit Chicken?
Port-A-Pit chicken is a style of grilled or pit-cooked chicken prepared with seasoning and frequent basting.
Unlike a typical grilled chicken breast that may be cooked quickly over direct heat, pit chicken benefits from slower, controlled cooking. The chicken gets time to develop color while the basting mixture adds another layer of flavor.
The result should be:
- Juicy chicken
- Well-browned skin
- Savory and slightly tangy flavor
- Light smoky notes
- Tender meat
- A flavorful exterior without being burnt
The exact seasoning and cooking method can vary, so there isn’t one universal Port-A-Pit recipe.
Port-A-Pit Chicken Recipe at a Glance
Prep time: 20 minutes
Marinating time: 2–8 hours
Cook time: About 45–60 minutes
Total time: About 3–9 hours including marinating
Servings: 6–8
Course: Main dish
Cuisine: American
Method: Grill / pit
Ingredients
For the Chicken
- 4 pounds chicken leg quarters or bone-in chicken pieces
- 2 tablespoons vegetable oil
- 2 teaspoons paprika
- 1 teaspoon garlic powder
- 1 teaspoon onion powder
- 1 teaspoon black pepper
- 1½ teaspoons salt
- ½ teaspoon dried oregano
- ¼ teaspoon cayenne pepper, optional
For the Basting Sauce
- 1 cup apple cider vinegar
- ½ cup water
- ¼ cup vegetable oil
- 2 tablespoons Worcestershire sauce
- 1 tablespoon hot sauce
- 1 teaspoon paprika
- ½ teaspoon garlic powder
- ½ teaspoon black pepper
- ½ teaspoon salt
The basting sauce is where much of the character comes from. It is tangy, savory, and light enough to brush onto the chicken several times during cooking.
How to Make Port-A-Pit Chicken
1. Prepare the Chicken
Pat the chicken dry with paper towels.
You don’t need to wash raw chicken. Drying the surface is enough and helps the seasoning stick better.
Trim any large pieces of excess fat if necessary.
2. Make the Dry Seasoning
Add the paprika, garlic powder, onion powder, black pepper, salt, oregano, and cayenne to a small bowl.
Mix well.
Rub the chicken with the vegetable oil, then coat each piece with the seasoning mixture.
Try to get some seasoning underneath loose areas of skin as well.
3. Let the Chicken Marinate
Place the seasoned chicken in a covered container and refrigerate it.
A few hours gives the seasoning time to work its way into the surface of the chicken. If you’re planning ahead, you can prepare the chicken the night before.
Keep raw chicken refrigerated while it marinates.
4. Prepare the Basting Sauce
Add the vinegar, water, vegetable oil, Worcestershire sauce, hot sauce, paprika, garlic powder, black pepper, and salt to a bowl.
Whisk until combined.
Set aside a clean portion for basting before it comes into contact with raw chicken.
That’s important. Never use raw-chicken marinade directly as a finishing sauce.
5. Set Up the Grill
For the best control, use a two-zone grill.
Put the hot coals on one side and leave the other side without direct coals.
If you’re using a gas grill, heat one side more strongly and leave the other side at lower heat.
The goal isn’t to cook the chicken over aggressive flames. You want steady heat that gives the chicken enough time to cook through.
6. Start Cooking the Chicken
Place the chicken on the cooler side of the grill.
Keep the lid closed and let the chicken cook gradually.
After about 15–20 minutes, check the pieces and turn them as needed.
If the skin is becoming dark too quickly, move the chicken farther away from the direct heat.
7. Start Basting
Once the chicken has started cooking, brush it lightly with the clean basting sauce.
Turn the pieces and brush the other side.
Continue cooking and basting periodically.
Don’t pour a large amount of sauce over the chicken at once. Thin layers work better because they can cook onto the surface without making the chicken soggy.
8. Control the Heat
This is probably the most important part of the recipe.
Chicken skin contains fat, and dripping fat can create flare-ups.
If flames suddenly rise, move the chicken to the cooler side of the grill.
You want the chicken to brown gradually rather than burn.
9. Check the Internal Temperature
Cooking time is only an estimate because chicken pieces vary in size.
Use an instant-read thermometer in the thickest part of the chicken without touching the bone.
Chicken should reach 165°F (74°C) internally for food safety.
If the outside looks perfect but the inside isn’t ready, move the chicken to indirect heat and continue cooking.
10. Rest Before Serving
Transfer the cooked chicken to a clean plate or platter.
Let it rest for about 5–10 minutes before serving.
That short rest makes the chicken easier to cut and helps retain its juices.
What Makes This a Good Pit Chicken Recipe?
A great pit chicken isn’t about throwing chicken over a very hot fire.
The better approach is controlled cooking.
You want the chicken to gradually develop:
Seasoning → browning → basting → light char → juicy interior
If the grill is too hot, the outside can burn before the chicken is cooked.
If the heat is too low, the chicken can take much longer than expected and the skin may not brown properly.
Finding that middle ground is the real trick.
Nelson’s Chicken Recipe: What Should You Expect?
When people search for Nelson’s chicken recipe, they’re often trying to recreate the flavor of the chicken sold in a Port-A-Pit-style setting.
There isn’t a reason to claim that a homemade recipe is the exact commercial formula unless the company itself has published it.
Instead, focus on the characteristics that make this style popular:
- Tangy basting flavor
- Savory seasoning
- Charred or browned exterior
- Moist chicken
- Controlled pit cooking
- Frequent light basting
This recipe is therefore best described as a Nelson’s-style or Port-A-Pit-inspired chicken recipe, rather than an official copy of a proprietary recipe.
Nelson’s Golden Glow Chicken Recipe
The search for Nelson’s golden glow chicken recipe is also closely related to the appearance of this style of grilled chicken.
That golden-brown finish comes from the combination of seasoning, heat, oil, and repeated light basting.
If you want a deeper golden color, don’t simply turn up the heat.
Instead:
- Keep the grill temperature controlled.
- Let the chicken brown gradually.
- Brush on thin layers of basting sauce.
- Turn the chicken regularly.
- Finish over slightly stronger heat only when the chicken is nearly done.
This gives you better control and reduces the chance of burning the exterior.
Is Port-A-Pit Chicken Smoked?
Not necessarily.
Port-A-Pit-style chicken can be cooked over a grill or pit without being traditionally smoked for hours.
There is a difference between grilled chicken exposed to some charcoal or wood smoke and true low-and-slow smoked chicken.
If you want more smoke flavor, charcoal can help. You can also use a small amount of appropriate smoking wood if your grill is designed for it.
Don’t overdo the smoke, though. Chicken absorbs smoke fairly easily, and too much can make the flavor bitter.
What Is the Best Liquid to Marinate Chicken In?
There isn’t one liquid that is best for every chicken recipe.
For this recipe, apple cider vinegar works well because it adds acidity and a sharp, tangy flavor.
Other options include:
- Lemon juice
- Buttermilk
- Plain yogurt
- Pickle juice
- Worcestershire sauce
- A combination of oil and mild acidity
The important thing is balance.
You don’t need to completely submerge chicken in a highly acidic liquid for a long time. A balanced marinade plus a flavorful basting sauce can give you plenty of flavor.
How Long Do You Cook Chicken on a Pit?
For bone-in chicken pieces, about 45–60 minutes is a reasonable starting estimate when cooking over controlled grill heat.
But don’t treat that number as a guarantee.
Chicken pieces differ in size, grills behave differently, and outdoor temperature can affect cooking.
The reliable test is the internal temperature.
Cook until the thickest portion reaches 165°F (74°C).
If you’re cooking larger pieces, give them additional time rather than increasing the heat dramatically.
Can You Make Port-A-Pit Chicken on a Gas Grill?
Absolutely.
Charcoal can provide additional smoky flavor, but a gas grill is perfectly capable of producing well-cooked, flavorful pit-style chicken.
The main difference is that you need to pay more attention to your heat setup.
Use one hotter zone and one cooler zone whenever possible.
That way, if the chicken starts browning too quickly, you can move it away from direct heat without stopping the cooking process.
Can You Use Chicken Breasts?
Yes, but chicken breasts require more attention.
They are leaner than thighs and leg quarters, so they can become dry if cooked too long.
For chicken breasts:
- Use pieces of similar thickness.
- Avoid excessive direct heat.
- Turn them as needed.
- Baste lightly.
- Check the temperature early.
- Remove them when they reach 165°F (74°C).
For beginners, bone-in thighs or leg quarters are generally more forgiving.
Best Sides for Port-A-Pit Chicken
This chicken already has plenty of flavor, so simple sides work best.
Try serving it with:
- Coleslaw
- Potato salad
- Baked beans
- Corn on the cob
- Macaroni salad
- Green beans
- Roasted potatoes
- Dinner rolls
- Garden salad
For an easy barbecue plate, chicken, baked beans, and coleslaw are hard to beat.
7 Tips for Better Port-A-Pit Chicken
1. Dry the chicken first
A dry surface browns better than a wet one.
2. Don’t cook directly over aggressive flames
Flare-ups can burn chicken skin very quickly.
3. Use a thermometer
Don’t rely on color alone to decide whether chicken is cooked.
4. Keep basting light
Several thin layers are easier to control than one heavy coating.
5. Don’t keep opening the grill
Every time you open the lid, heat escapes.
Check the chicken when needed, then close the grill again.
6. Move the chicken when necessary
If one piece is cooking faster than another, don’t be afraid to move it.
Good grilling isn’t about leaving every piece in exactly the same spot.
7. Rest the chicken
Give the chicken a few minutes before serving.
It’s a small step, but it makes the final result better.
Common Mistakes to Avoid
Using too much heat
High heat may create beautiful color quickly, but the chicken can burn before the center is cooked.
Adding sauce too early
A sauce containing acidic or sugary ingredients can darken quickly over direct heat.
Start with seasoning and add basting sauce gradually.
Overcrowding the grill
Leave space between the chicken pieces so heat can circulate.
Guessing doneness
Chicken can look cooked while the center is still below a safe temperature.
Use a thermometer.
Reusing raw marinade
Keep a clean portion of basting sauce separate for cooking.
If marinade has touched raw chicken, it needs to be cooked thoroughly before being used as a sauce.
Port-A-Pit Chicken Recipe (Nelson’s-Style Pit Chicken)
Ingredients
Equipment
Method
- Prepare the chicken: Pat the chicken dry with paper towels and trim any excess fat if needed.
- Make the seasoning: Mix paprika, garlic powder, onion powder, black pepper, salt, oregano, and cayenne pepper in a small bowl.
- Season: Rub the chicken with vegetable oil, then coat all sides evenly with the seasoning mixture.
- Marinate: Cover and refrigerate the chicken for at least 2 hours or up to overnight.
- Make the basting sauce: Whisk together apple cider vinegar, water, vegetable oil, Worcestershire sauce, hot sauce, paprika, garlic powder, pepper, and salt.
- Prepare the grill: Set up a two-zone grill with a hot side and a cooler side. Aim for controlled medium heat rather than strong flames.
- Cook the chicken: Place the chicken on the cooler side of the grill. Close the lid and cook gradually, turning occasionally.
- Baste: Brush the chicken lightly with the clean basting sauce as it cooks. Continue turning and adding thin layers of sauce.
- Control the heat: If the chicken becomes too dark or flames flare up, move it farther away from direct heat.
- Check for doneness: Use an instant-read thermometer in the thickest part of the chicken. It should reach 165°F (74°C).
- Rest: Transfer the cooked chicken to a clean plate and let it rest for 5–10 minutes before serving.
Notes
- Keep the grill temperature controlled to prevent burning.
- Use a clean portion of basting sauce for the chicken.
- Do not reuse marinade that has touched raw chicken unless it is thoroughly cooked first.
- Bone-in chicken pieces work especially well for this pit chicken recipe.
- Cooking time can vary depending on chicken size and grill temperature, so use internal temperature as the final test.
Frequently Asked Questions
What are some popular Port-A-Pit recipes?
Chicken is the most recognizable Port-A-Pit-style preparation, particularly bone-in chicken pieces such as leg quarters and thighs. The common approach is controlled grilling with seasoning and repeated basting.
Is Port-A-Pit chicken smoked?
Not always. Some cooking setups provide a smoky charcoal flavor, but Port-A-Pit-style chicken doesn’t automatically mean traditional smoked chicken.
What is the best liquid to marinate chicken in?
For this recipe, apple cider vinegar provides the tangy base. Lemon juice, buttermilk, yogurt, or pickle juice can also work depending on the flavor you’re trying to create.
How long do you cook chicken on a pit?
Bone-in chicken commonly takes around 45–60 minutes over controlled grill heat, but cooking time varies. Always check the thickest part with a thermometer and cook until it reaches 165°F (74°C).
Can I use chicken thighs instead of leg quarters?
Yes. Chicken thighs are a good choice for grilling because they remain relatively forgiving when cooked slightly longer than leaner cuts.
Can I make this recipe without charcoal?
Yes. A gas grill works well. You may get less natural smoky flavor, but the seasoning and basting still provide plenty of flavor.
How far ahead can I prepare the chicken?
You can season and refrigerate the chicken several hours before grilling. Preparing it earlier in the day is an easy way to make dinner less stressful.
Final Thoughts
This port a pit chicken recipe is really about technique more than complicated ingredients.
Give the chicken enough time to absorb the seasoning, keep your grill under control, baste it gradually, and don’t rush the final cooking stage.
If you’re chasing that Nelson’s chicken recipe flavor at home, those are the details I’d pay the most attention to.
And remember, this is a Nelson’s-style interpretation, not an official Nelson’s recipe. Your grill, chicken pieces, and preferred level of seasoning will all affect the final result.
Once you get comfortable with the heat and basting, pit chicken becomes one of those recipes you can make without constantly checking a recipe card.
2 thoughts on “Port A Pit Chicken Recipe: Nelson’s-Style Pit Chicken at Home”